
What you’ll learn
A Punch Walk brings outstanding issues, photos, and drawing references together in one project record. Use this guide to create the walk, document each item, and share a clear report.
- Customer / project
- Punch Walk
- Punch items
- Review
- Share
Before you begin
Sign in, select the correct workspace, and have a customer and project ready. Gather any photos and drawing snapshots you want to attach.
- Punch Walk
- The project record for the walk, its overall details, and its report.
- Punch item
- An individual issue with its own title, status, location, notes, and supporting images.
STEP 1 OF 9
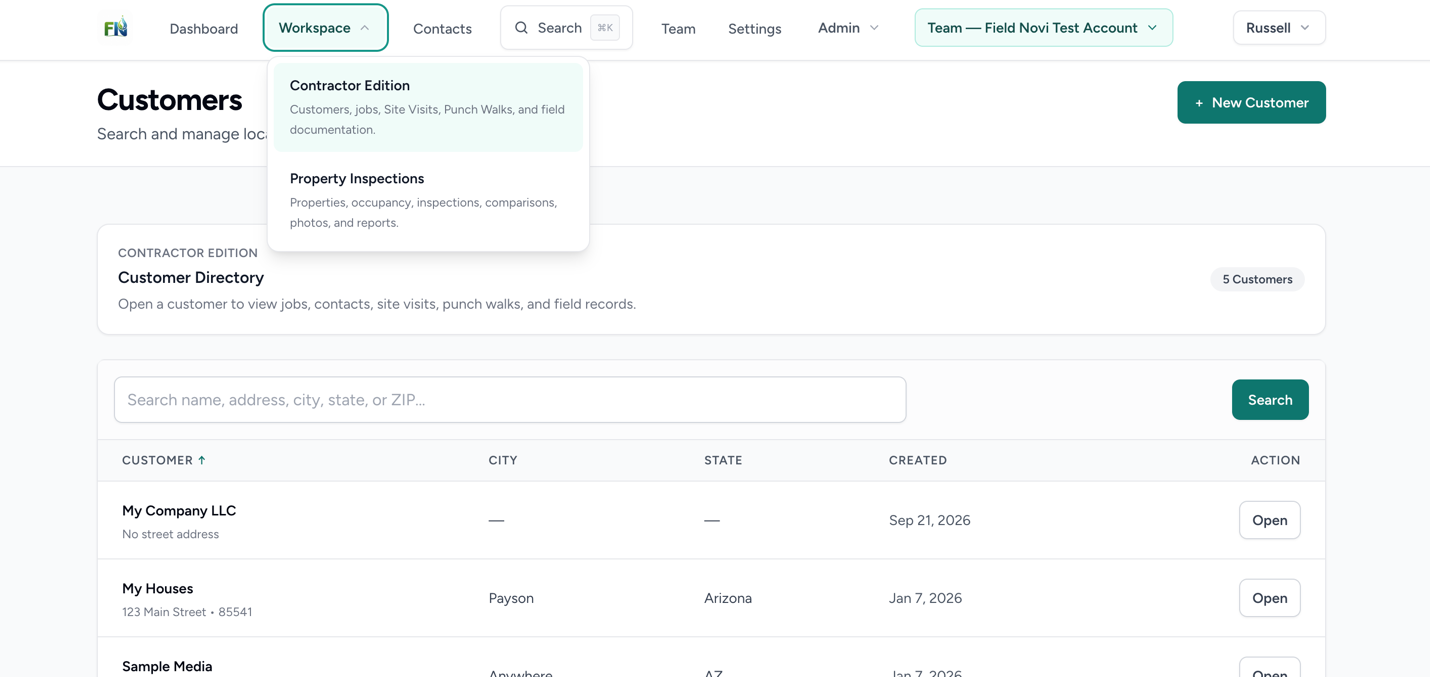
Open Contractor Edition and choose the customer
Open Workspace → Contractor Edition. Find the customer and select Open. If the customer is missing, select + New Customer.
Need to set up a customer or project first? Follow the Site Visit setup steps.
STEP 2 OF 9
Start a new Punch Walk
In the Customer Workspace, select + Punch Walk. This opens the new Punch Walk form.

STEP 3 OF 9
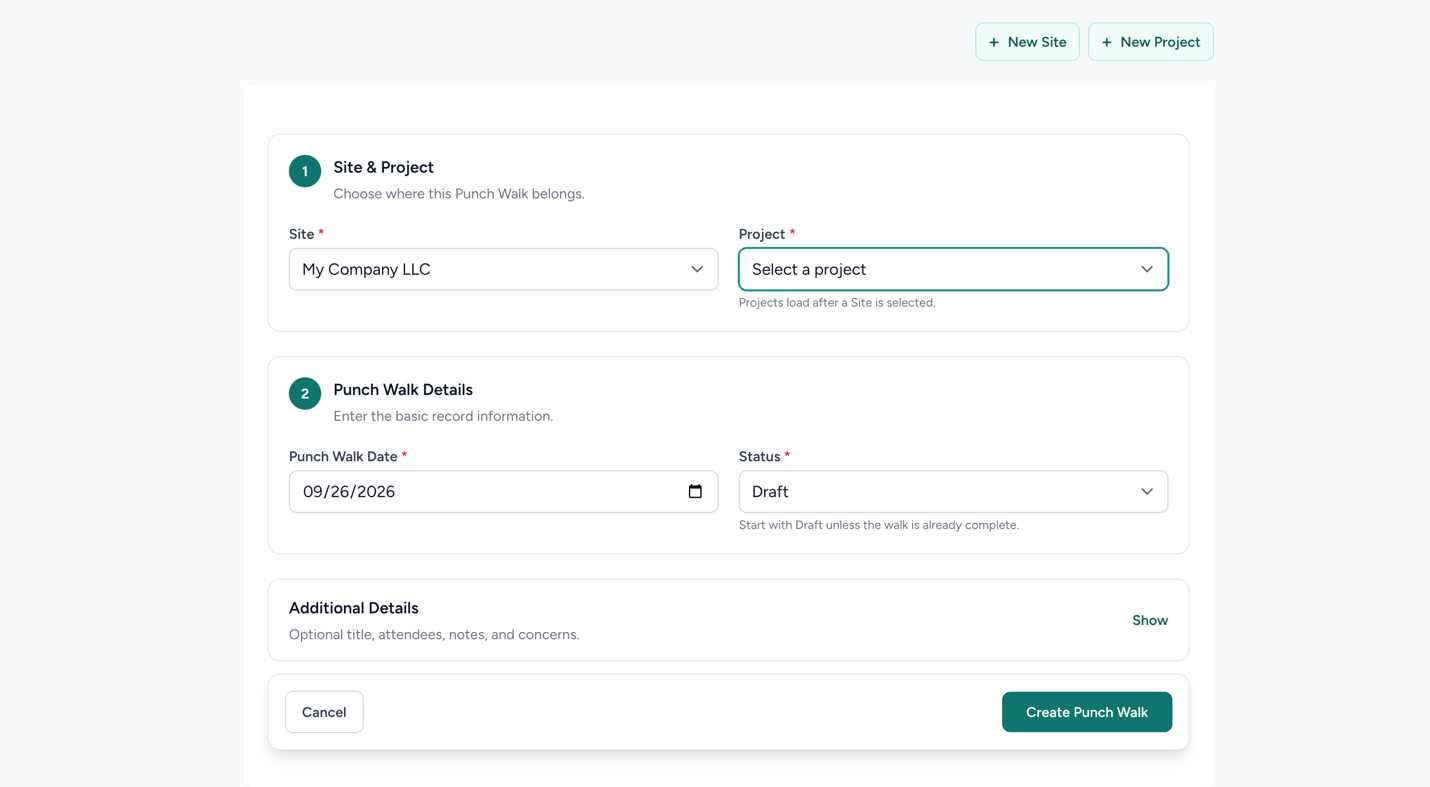
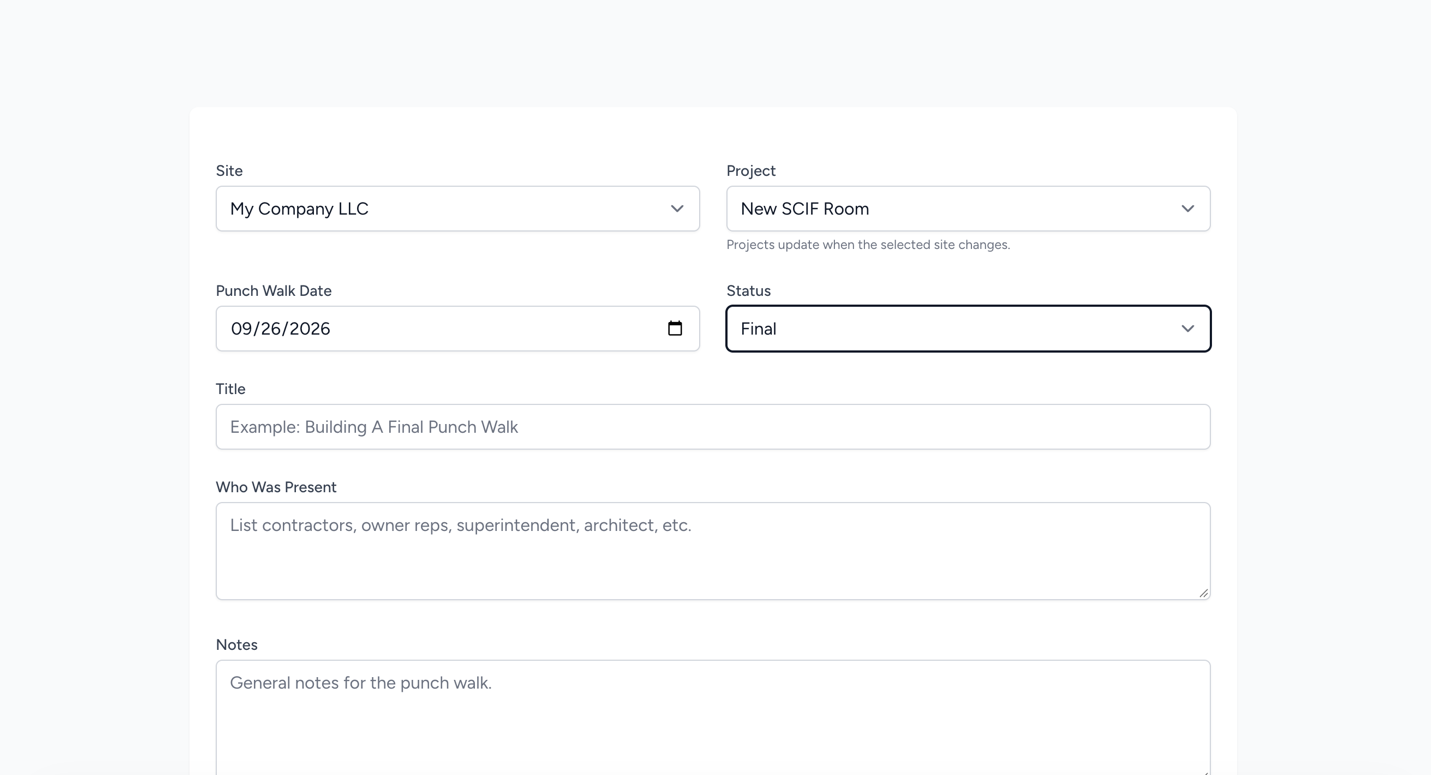
Confirm the customer, project, and date
Check the Site and Project selections. The form uses “Site” for the customer location. Change the selection if needed, or use + New Project to create a project.
Choose the Punch Walk Date and Status. Start with Draft while you are still documenting the walk.
STEP 4 OF 9
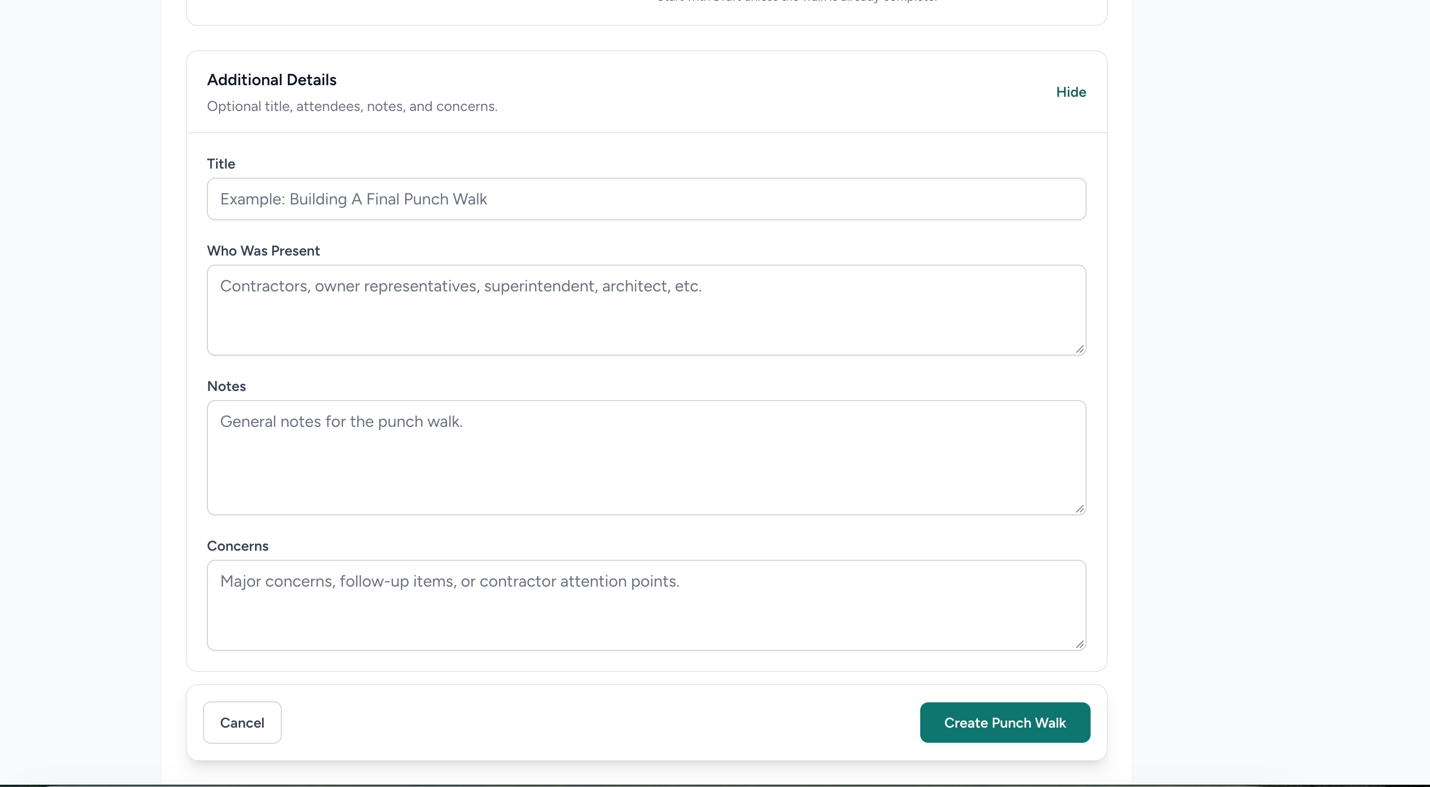
Add the walk details and create the record
Expand Additional Details to enter a title, who was present, notes, and concerns. These details are optional and can be edited later.
Select Create Punch Walk to save the record.
STEP 5 OF 9
Add each issue as a punch item
In Punch Items, give the issue a clear Title. Select its Status and add the Plan Sheet, Plan Location Note, Notes, and Concerns that will help someone find and resolve it.
Select Add Punch Item. Repeat for each separate issue.
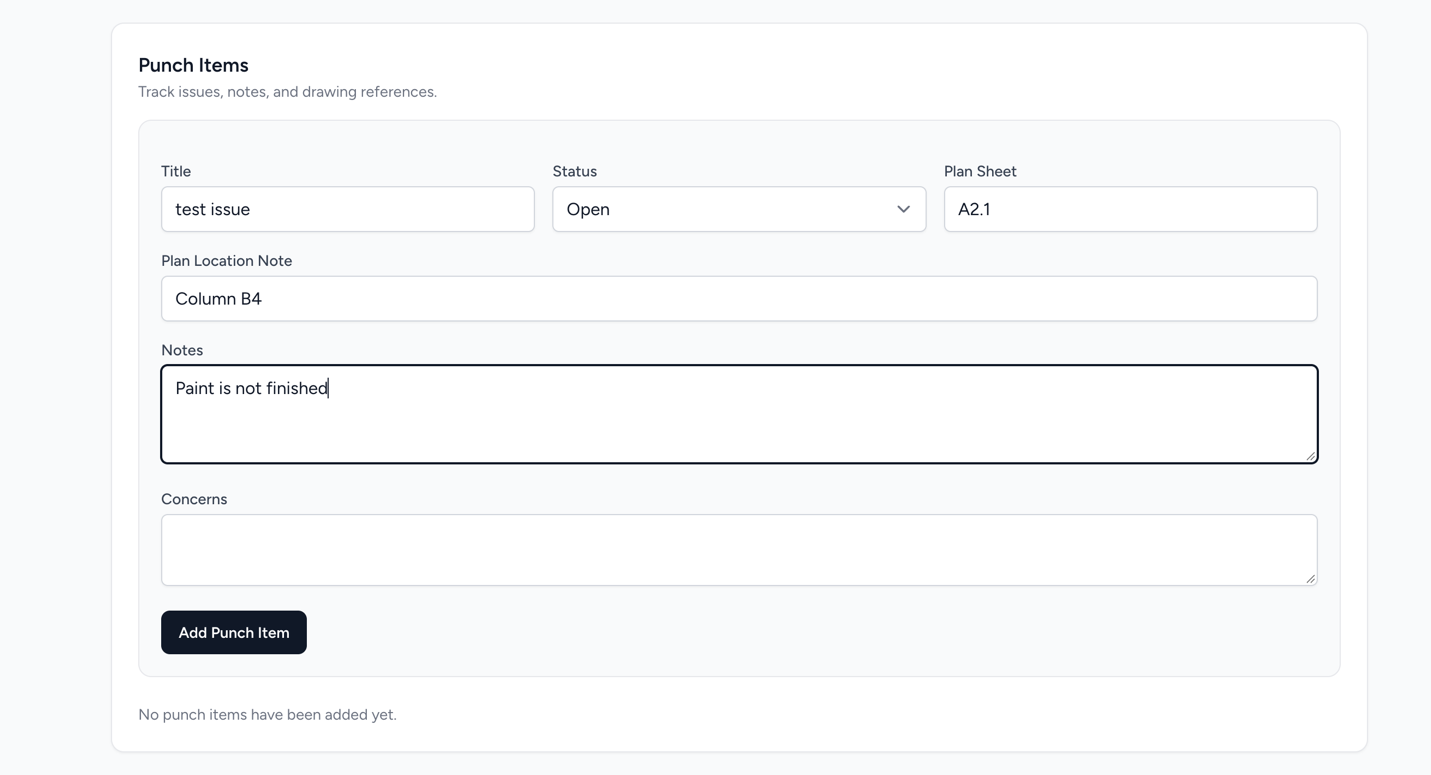
Helpful tip Use a specific title, such as “Unfinished paint at Column B4,” so the issue is easy to identify in the report.
STEP 6 OF 9
Add photos and drawing snapshots
After creating a punch item, upload a photo of the defect and, when useful, a snapshot of the relevant drawing. Keep the image attached to the issue it describes.
Continue until all issues are recorded. Check that each item has enough location information for the person doing the correction.
STEP 7 OF 9
Check the PDF and update the walk status
Open the PDF report and review the item descriptions, images, and project information. Edit any details that need correction.
When the Punch Walk report is ready, edit the walk, choose the appropriate status, and save your changes. The example below shows Final. Individual punch items have their own statuses; review those separately as work progresses.
GOOD HABITS
Best practices
- Record one issue per punch item so descriptions, images, and status stay together.
- Use plan sheet and location references that another person can follow.
- Review the PDF and the recipient view before relying on a shared report.
- Choose an expiration and access options appropriate for the recipients.
QUICK ANSWERS
Common questions
Do I need a customer and project first?
Yes. Create or select a customer and project before saving the Punch Walk. The Site Visit guide covers customer and project setup.
Can I add more details after creating the walk?
Yes. Edit the Punch Walk to add or correct its title, attendees, notes, concerns, and status.
Does marking the walk Final close every issue?
The walk status and punch-item statuses are separate controls. Review each item’s status; do not assume changing the walk status resolves the individual issues.
Do contacts have to be added to the project before I email them?
No. You can select a contact from the Address Book for a share. Add them to the project when you want them associated with it for future use.
A recipient cannot open the report. What should I check?
Check the link expiration and the sharing options. If the link expired, create a new link with the intended access and send that link to the recipient.
FIELDNOVI SUPPORT
Still need help?
Email support@fieldnovi.com for questions or anything that is not working as expected.
Include these details
- Your name and organization.
- The workspace and any relevant record names.
- What you were trying to do and what happened instead.
- Any error message and a screenshot, when possible.
- The approximate date and time the issue occurred.
Do not include passwords or payment card details.