
From a new property to a completed, shared inspection
Create the property, connect the people involved, record an occupancy, and document the inspection room by room. Use general room photos, checklist-item evidence, and assigned 360° snapshots to keep the record organized. Finish by reviewing, completing, and sharing the report.
- Property
- Contacts & occupancy
- Inspect & photograph
- Review & complete
- Share & compare
Before you begin
Sign in, confirm the personal or team workspace shown in the header, and open Workspace → Property Inspections. Have the property address, relevant contacts, occupancy information, and inspection photos ready. The available controls depend on your role. Screenshots are examples; names, dates, counts, and available items will differ. Contact identities are masked in this public guide.
Wait for “Inspection changes saved” before leaving the checklist. Choosing a photo does not upload it—select Upload and confirm it appears in the gallery. Complete Inspection is a separate action that locks the checklist and media. Public sharing becomes available after completion.
- Property contacts
- People associated with the property, such as its owner, property manager, or realtor / agent.
- Occupancy contacts
- People associated with a particular tenancy: Tenant, Co-Tenant, Occupant, or Guarantor.
- Section and checklist item
- A section is a room or area, such as Main Bedroom. Its checklist items describe features such as Windows, Lights, or Floors / Carpet.
- Baseline
- An earlier inspection used to compare recorded conditions with the current inspection, when that inspection type supports comparison.
STEP 1 OF 16
Open Property Inspections and add a property
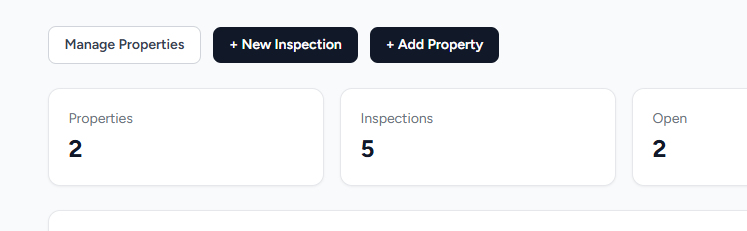
Select Workspace → Property Inspections. Select Manage Properties, then + Add Property.
For an existing property, open its record instead of adding the same address again. A property can have multiple inspections over time.
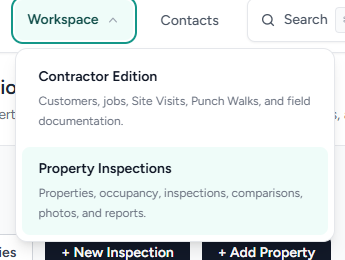

Helpful tip Check the team or personal workspace name in the header before creating records. The Workspace menu selects the product area; the workspace-name menu selects whose records you are working in.
STEP 2 OF 16
Enter and save the property information
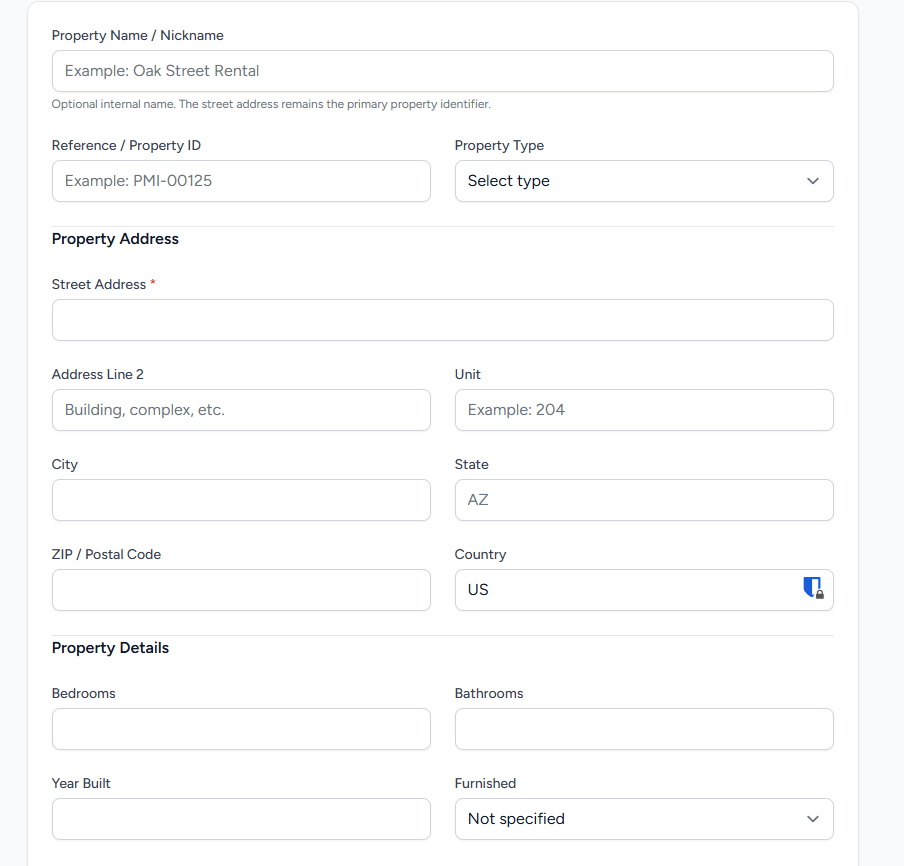
Complete the property form. Enter the Street Address and any other fields marked as required. Add the unit, city, state, postal code, and country as appropriate.
Use Property Name / Nickname for a helpful internal name and Reference / Property ID for your own identifier. Add the property type, bedroom and bathroom counts, year built, and furnished status when known.
Review the address and unit carefully, then select Create Property.
Helpful tip Use a consistent property name and unit number so the correct property is easy to find later.
STEP 3 OF 16
Connect the owner, manager, and other property contacts
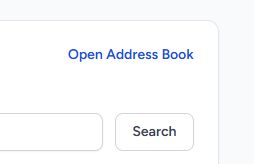
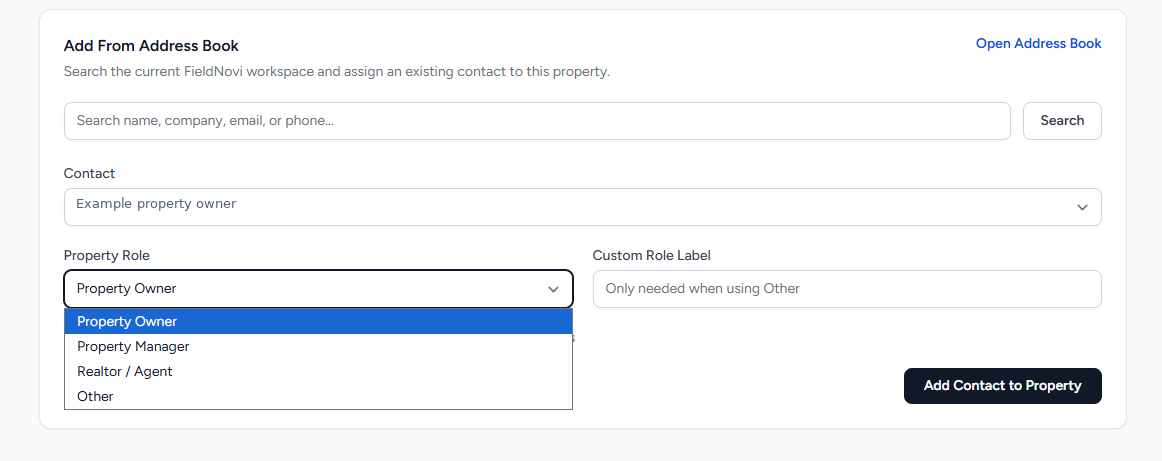
In Property Contacts, select Manage Contacts. Search the Address Book and choose an existing contact. If the person is missing, use Open Address Book to create the contact, then return to the property.
Choose the Property Role: Property Owner, Property Manager, Realtor / Agent, or Other. Use the custom role label when appropriate for Other. Select the primary-contact option when needed; only one contact can be primary for each role.
Enable Preselect when emailing inspection reports for the contacts you normally include. Select Add Contact to Property and repeat for the other people. When finished, select Back to Property.
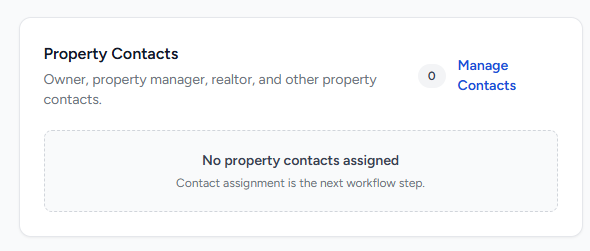
Helpful tip Adding a contact organizes the report relationship. It does not invite that person to your team or give them access to edit your workspace.
STEP 4 OF 16
Create the occupancy or tenancy record
In Occupancy / Tenancy, select Manage Occupancies. Select Add First Occupancy when the property does not yet have one.
Choose the Occupancy Status. Enter the lease start and end dates, actual move-in and move-out dates when known, and any occupancy notes. Select Create Occupancy.
Only one occupancy can be Active for a property at a time. Use the occupancy that corresponds to the people and dates being documented.
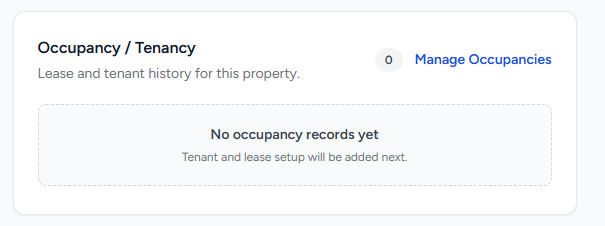

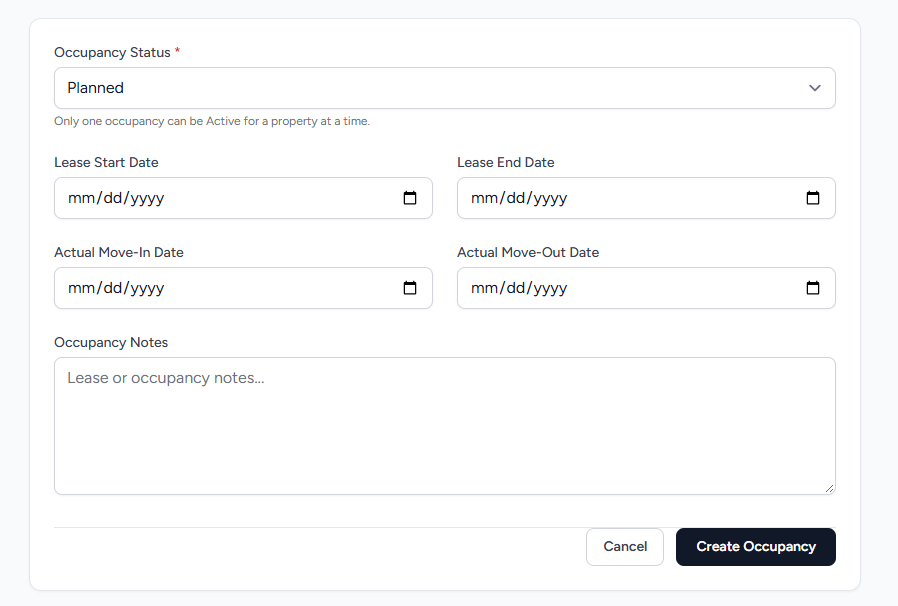
Helpful tip Move-In and Move-Out inspections must be tied to an occupancy. Keep both inspections connected to the same occupancy for the matching Move-In baseline.
STEP 5 OF 16
Connect the tenants, occupants, and guarantors
In Tenant / Occupant Contacts, select Manage Contacts. Find an existing Address Book contact or create one and return.
Choose Tenant, Co-Tenant, Occupant, or Guarantor. Set the primary-contact and default-report-recipient options as appropriate, then select Add Contact to Occupancy.
Repeat for each person involved. When finished, select Back to Occupancy.
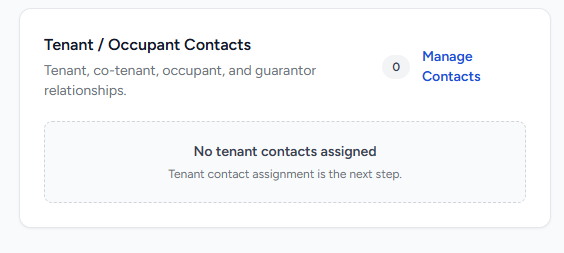
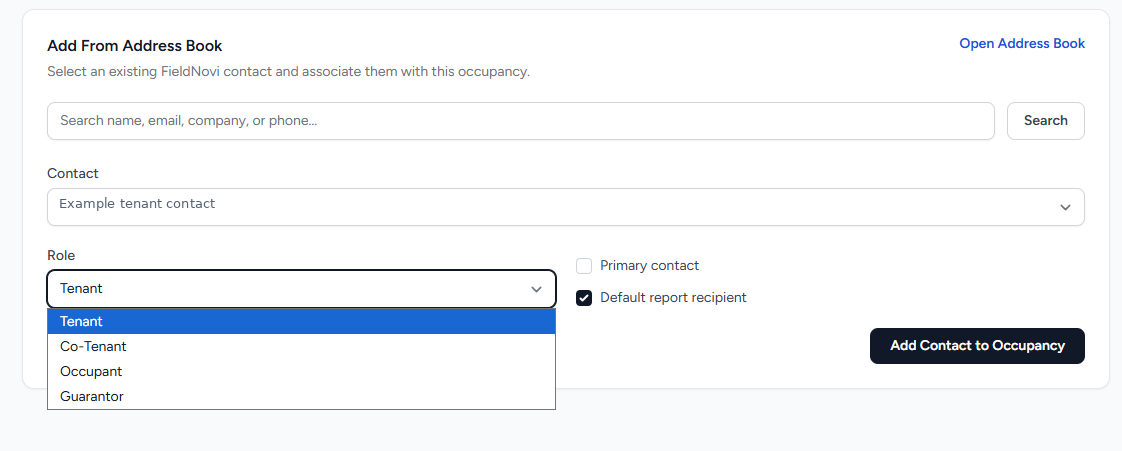
Helpful tip Confirm email addresses before marking default recipients. You still review and select recipients when sharing each report.
STEP 6 OF 16
Create the inspection and choose its type
Select + New Inspection from the occupancy. Once the property and occupancy are set up, you can also start from + New Inspection in the Property Inspections workspace.
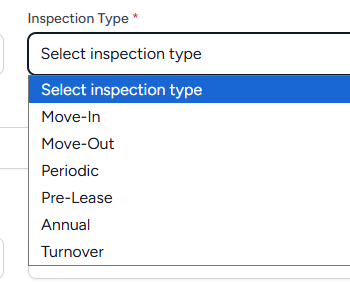
Confirm the property and occupancy, enter the inspection details and date, and choose the inspection type. Use Draft or In Progress while recording the inspection. Review any baseline selection before creating the record.
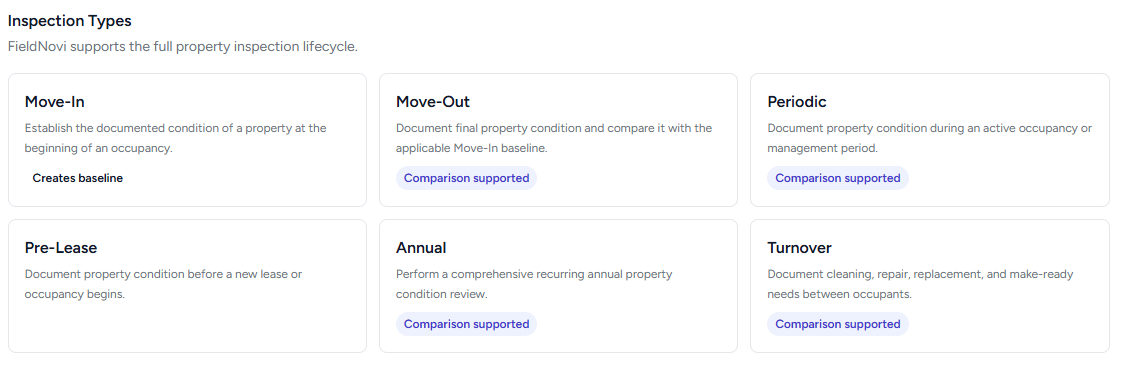
- Move-In: document condition at the beginning of the occupancy and establish a baseline.
- Move-Out: document final condition and compare with the applicable Move-In baseline for that occupancy.
- Periodic: record condition during an occupancy or management period; comparison is optional.
- Pre-Lease: document condition before a new lease or occupancy.
- Annual: document the recurring annual condition review; comparison is supported.
- Turnover: document cleaning, repairs, replacement, and make-ready work between occupants; comparison is supported.
Complete the form and create the inspection.

Helpful tip Choose the property, occupancy, inspection type, and comparison carefully. These structural selections are locked after the checklist has been initialized.
STEP 7 OF 16
Open a section and check its progress
Review the inspection type and status. Under Review & Complete, the progress panel shows how many required checklist items have a condition.
Open a section such as Exterior / Entry, Living Room, or Main Bedroom. Its heading shows the completed-item count, remaining items, and attention indicators.
Use Expand all, Collapse all, and Next incomplete to navigate the checklist. Add general section notes when needed, then work through the individual items.

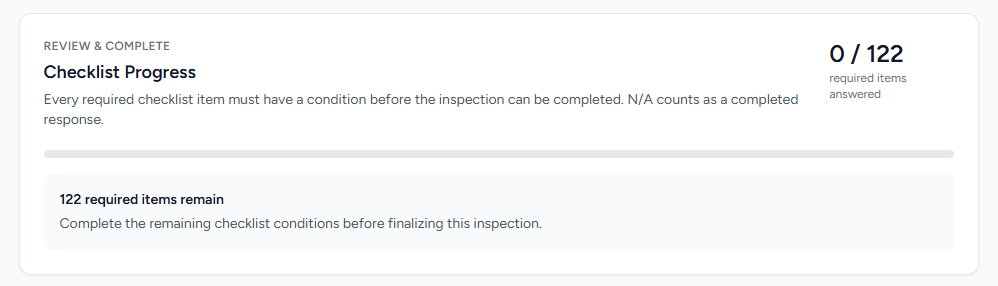
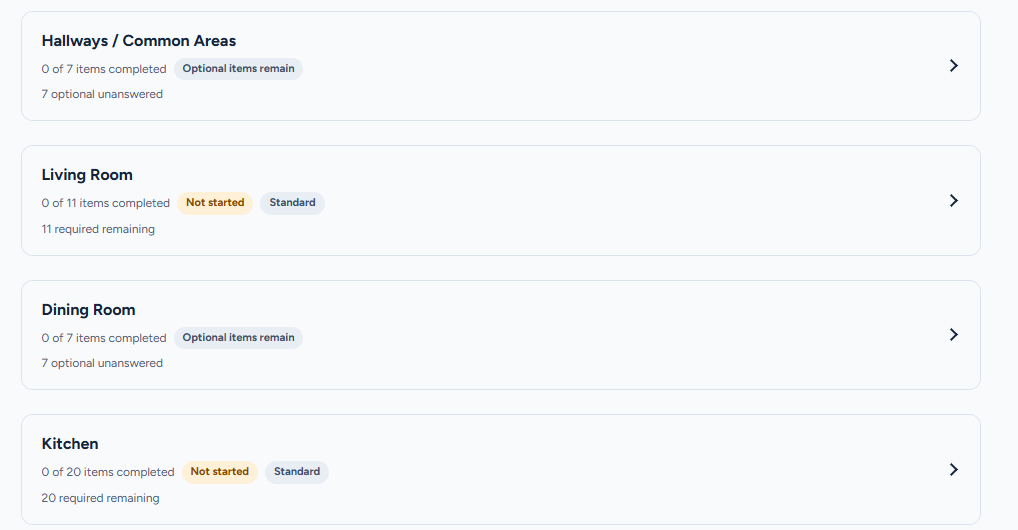
Helpful tip An answered item can still need attention. “Complete” describes checklist progress; it does not mean that every feature is in good condition. Optional unanswered items are shown separately.
STEP 8 OF 16
Upload general photos at the section level
Use Section Photos for overall room or area views. Use the individual checklist items for close-up defect evidence, such as a damaged window, a light fixture, or a carpet stain.
Choose Regular Photo or 360° Photo, choose the file or files, then select Upload. Wait for the upload to finish and confirm the image appears in the gallery.
Pending checklist and section-note edits are saved before the upload proceeds. The original 360° photo remains at the section level when you later create item-specific snapshots.
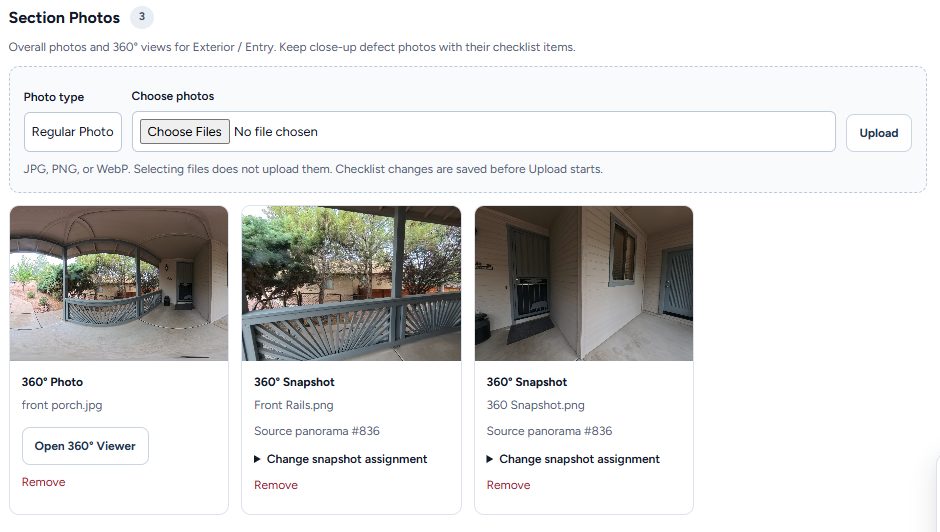
Helpful tip Choosing a file is not an upload. Finish each selected-photo upload before leaving the page or completing the inspection. The pictured controls accept JPG, PNG, or WebP files.
STEP 9 OF 16
Capture a snapshot and choose where it belongs
On a 360° photo, select Open 360° Viewer. Rotate the view to show the detail you need, then select Capture Snapshot.
In Attach snapshot to, select the section’s General photos or an individual checklist item in that section. For example, attach a missing-blind snapshot to Window Coverings, or a damaged-light snapshot to the relevant light-fixture item. The list uses your inspection’s actual item names.
Enter a descriptive Title, add optional notes, and select Save Snapshot. Check that the snapshot appears under the selected destination.
To correct its destination later, expand Change snapshot assignment on the snapshot while the inspection is editable. The source panorama is retained; you do not need to capture the image again.
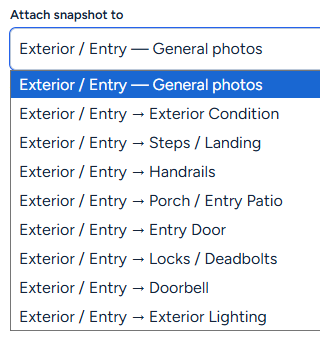
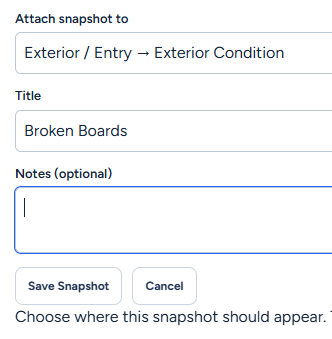
Helpful tip Assigning a snapshot does not fill in the item’s condition. Open the destination item and record the condition and notes too.
STEP 10 OF 16
Enter the condition and attach defect evidence
Choose a Condition for each checklist item. Add useful Notes, an Estimated Cost when you have an estimate, and Potential Responsibility when appropriate. Use Requires Attention to identify an item that needs follow-up.
Use the item’s photo controls to upload regular photos or 360° images of that specific feature. Select the file and press Upload; confirm it appears with the item.
Choose N/A when a checklist item genuinely does not apply. Choose Missing for a feature that should be present but is absent. Leave an uninspected feature as Not inspected until it can be assessed; do not use N/A just to clear the remaining count.
Continue through the sections until the required items have been assessed.
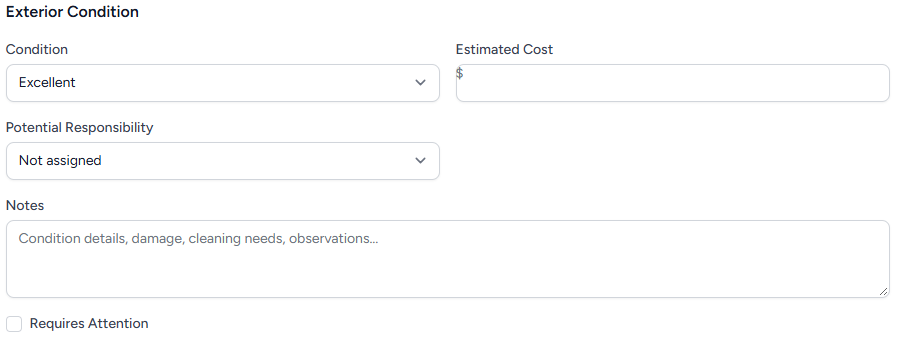
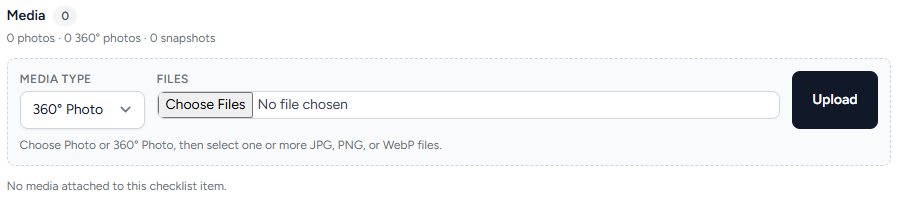
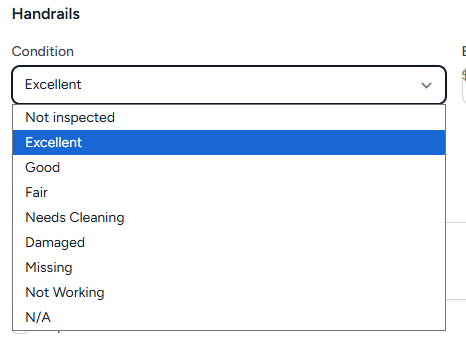
Helpful tip Keep notes factual and specific: identify the room, the feature, and what you observed. A photo alone does not answer the condition field.
STEP 11 OF 16
Watch the remaining count and save status
The floating Checklist progress toolbar shows the number of items left, the answered/total count, required items left, and optional unanswered items.
Checklist fields and section notes save automatically while you work. Use Save Checklist for an immediate save and wait for Inspection changes saved before leaving. The item count reflects your current selections; check the save message as well.
Select ↑ Back to Review & Complete to return to the completion controls without scrolling through the full list.
If the page reports Not saved or another error, keep it open, read the message, and retry the save when the problem is resolved. Do not assume changes reached the server if the connection or session has failed.
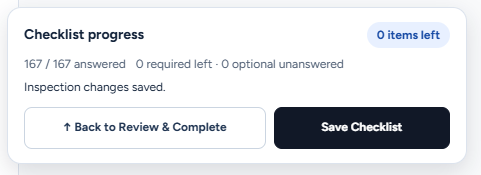
Helpful tip Autosave covers the checklist and section notes. On other forms, such as property setup or Edit Inspection Details, use the displayed Create or Save control. Selecting photos still requires Upload.
STEP 12 OF 16
Review the record and complete the inspection
Before completing, verify the property, occupancy, inspection date, conditions, notes, and photos. Finish all selected-photo uploads and resolve any save errors.
Use ↑ Back to Review & Complete. The required-item count must show 0 required items left. N/A counts as an answered condition; optional unanswered items are identified separately.
Select Complete Inspection and accept the confirmation. Pending checklist edits are saved first. After completion, confirm the inspection shows Completed & Locked.
The checklist and media are now read-only. Sharing becomes available for the completed report.
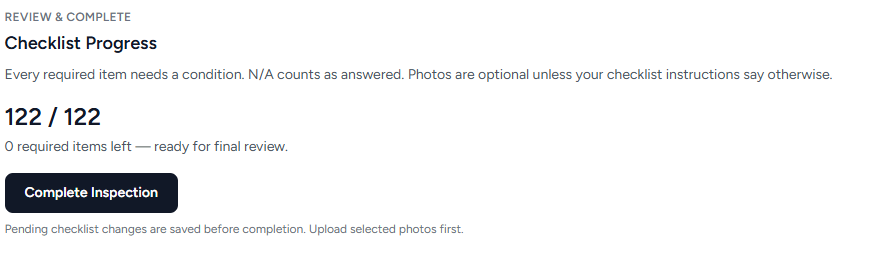
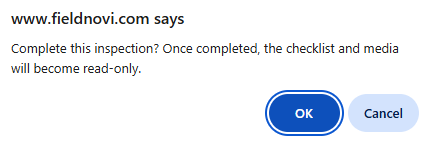
Helpful tip Zero items left is not the same as a completed inspection. You must still use Complete Inspection and confirm.
STEP 13 OF 16
Create a secure link for selected recipients
After completion, open Report Sharing → Share report. Review the contacts attached to the property and occupancy and select the people who should receive this report.
Choose Link Expires and decide whether to allow images and interactive 360° photos and the PDF report.
Leave Email the selected recipients checked when you want FieldNovi to send the link by email. Clear that option when you only need to create a link to copy and distribute yourself.
Select Create Secure Link. Review the confirmation and any email-delivery results; creating a link is not a guarantee that every email was delivered.
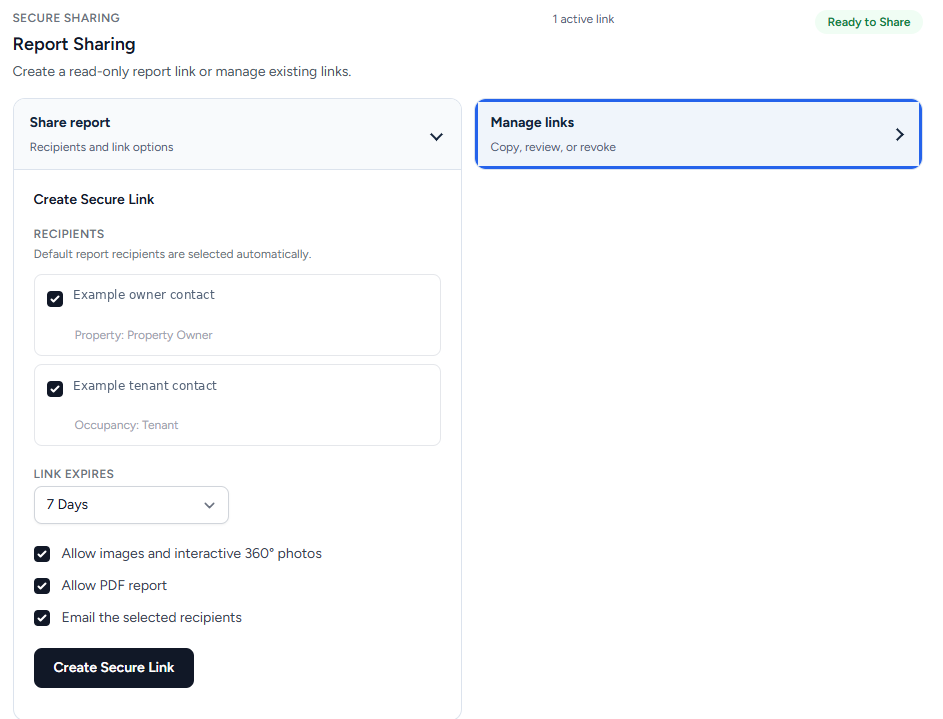
Helpful tip Review recipients and permissions for every share, even when default recipients have already been selected.
STEP 14 OF 16
Review, copy, or revoke a shared link
Open Report Sharing → Manage links. Review each link’s status, expiration, recipients, and view count.
Use Copy Link or Open to check the shared page. Use PDF when that option is enabled. Choose Revoke and confirm when a link should no longer provide access.
Check the recipient view to make sure it contains the photos and report options you intended to share.
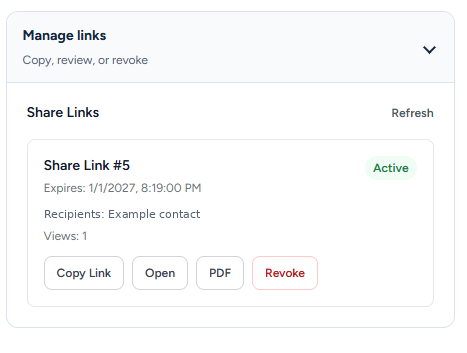
Helpful tip Keep share links private. Revoking a link stops access through that link; it does not remove copies a recipient has already downloaded.
STEP 15 OF 16
Compare with an earlier inspection
Create a later inspection using a type that supports comparison and an eligible earlier baseline. A second inspection does not automatically guarantee a comparison; confirm the baseline shown on that inspection.
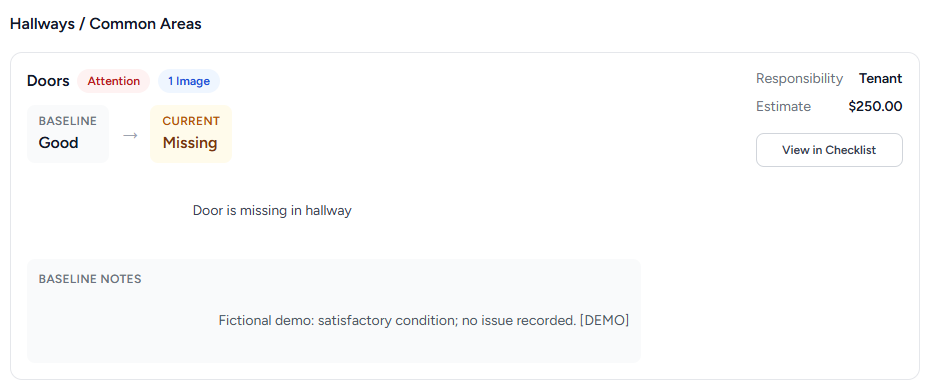
Expand Baseline comparison to review the source inspection, compared items, changed and unchanged conditions, attention counts, and changed-item estimates. Use View Baseline to open the earlier record.
Move-Out uses the applicable earlier Move-In for the same occupancy. Periodic comparison is optional. Annual and Turnover also support comparison according to their inspection type.
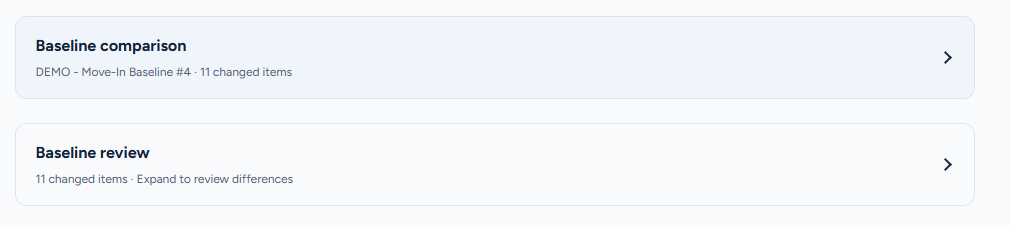
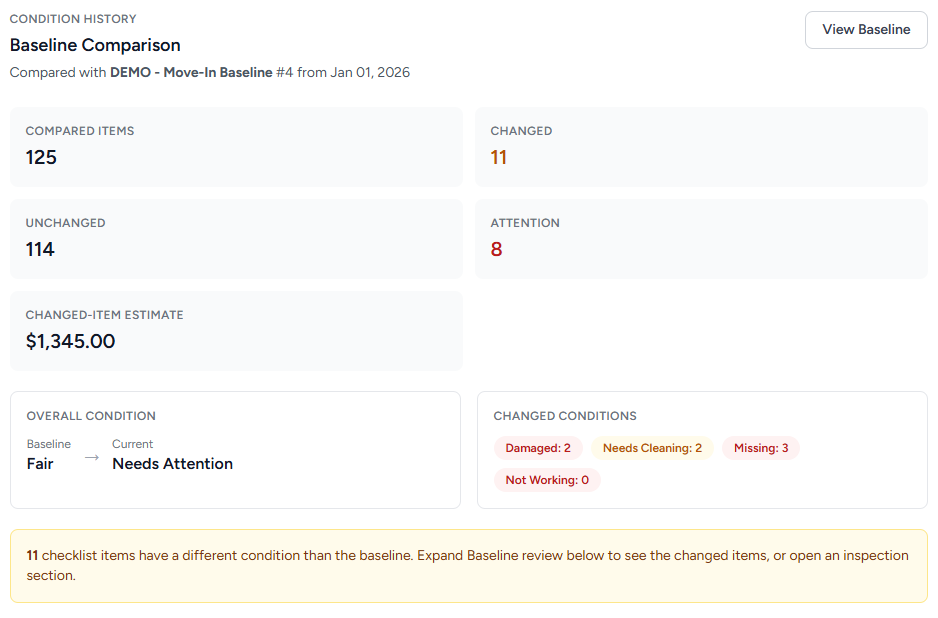
Helpful tip The comparison highlights recorded condition changes. It is not a complete change log of every photo or note, and a changed condition is not necessarily a defect.
STEP 16 OF 16
Review the details behind each change
Expand Baseline review to see the changed checklist items. Compare the Baseline condition and notes with the Current entry, recorded responsibility, and estimate.
Use View in Checklist to open the corresponding item in the current inspection. Review its evidence and correct any details while the inspection is editable.
Use this comparison to document what was observed at each inspection and what changed between them.
Helpful tip Conditions, cost estimates, and responsibility entries are recorded inspection information. They do not independently determine legal liability or security-deposit deductions.
GOOD HABITS
Best practices
- Set up once, inspect many times. Reuse the property and correct occupancy rather than creating duplicate property records.
- Capture context and detail. Put overview images in Section Photos and defect evidence on the checklist item.
- Start with a clear baseline. Document Move-In conditions thoroughly before comparing later inspections.
- Check saving and uploading separately. Wait for the saved message and verify new photos in their gallery.
- Review before completing. Confirm required conditions, photos, date, property, and occupancy before locking the record.
- Review every share. Check recipients, expiration, image access, PDF access, and whether email is enabled.
QUICK ANSWERS
Common questions
Why does a section say Complete but still need attention?
Complete means the relevant checklist responses have been entered. Damage, cleaning needs, and other recorded problems can still require follow-up. Progress and property condition are separate.
Why does the page show items left when all required items are answered?
The floating toolbar separates required items from optional unanswered items. Review the required count in Review & Complete; optional unanswered items are not the same as missing required responses.
Why is my photo not in the report?
Confirm you pressed Upload and that the image appears in the correct section or item gallery. For a shared report, also confirm that image access was allowed on that link.
Can I move a 360° snapshot from General photos to Windows?
Yes. While the inspection is editable, use Change snapshot assignment and choose the appropriate item in the same section. The original panorama remains in place.
Why can I not complete or share the inspection?
Check the required-item count, save errors, and selected photos awaiting upload. Complete the inspection and accept the confirmation before sharing. A read-only role cannot make these changes; ask your workspace owner or administrator when controls are unavailable.
Does Create Secure Link email every property contact?
No. Review the selected recipients and the Email the selected recipients option. Email delivery is requested only when that option is enabled. Check the displayed delivery results.
Why is there no baseline comparison?
Confirm the inspection type supports comparison and an eligible earlier inspection exists. Move-In and Pre-Lease do not automatically compare backward; a Periodic comparison must be selected. Check the same-occupancy relationship for Move-Out.
FIELDNOVI SUPPORT
Still need help?
Email support@fieldnovi.com for questions or anything that is not working as expected.
Include these details
- Your name and organization.
- The workspace and any relevant record names.
- What you were trying to do and what happened instead.
- Any error message and a screenshot, when possible.
- The approximate date and time the issue occurred.
Do not include passwords or payment card details.